Category: Battery Chargers

  • I built a thing: an improved solar battery charger

    First off, my apologies for a long time away from the blog: between family, life, work, travel, and other commitments things have been busy and the blog had fallen by the wayside.

    Background

    That said, recently I’ve started getting involved with Meshtastic, a license-free, open-source, off-grid mesh network that can run on cheap, low-power hardware and allows people to exchange text messages with others, either through direct messages and private or public chat “channels” (akin to a “chat room” of old). I’m interested in this as both a fun way to socialize with nerdy people in the area, but it also looks very handy for communication in emergency situations like after an earthquake.

    I recently installed a solar-powered Meshtastic node on my roof’s antenna mount (currently also host to my house’s GPS antenna) using RAK Wireless WisBlock hardware which is known for being quite low-power. These modules can run from USB, a battery (e.g., a lithium-ion cell), and even have an onboard TP4054 lithium-ion battery charger module connected to a port labeled “solar”, and their product descriptions refer to the device being intended to charge a lithium-ion cell from a small, 5V nominal solar panel.

    RAK’s choice of the TP4054 as an onboard charger chip was a bit puzzling to me: it is a fine charger chip if used with a fixed supply voltage (like from USB), requires minimal external components (one resistor and two capacitors), and does a great job charging Li-ion cells, but it lacks any ability to reduce its current consumption on the fly to match a variable-output supply voltage like a solar panel that might be able to supply plenty of current during the peak sunny hours during the day, but only a limited amount during the mornings, evenings, or during cloudy days.

    Various charger chips exist to charge batteries from solar panels, including the CN3065 linear and CN3791 “MPPT” switch-mode charger. Both adjust their charging current automatically to not overload a solar panel, but the CN3065 has a more limited input range than the CN3791.

    CN3791-based charger ICs are available from various vendors for reasonable prices, I don’t like the most commonly available model for a variety of reasons. In particular, they try to keep the solar panel voltage above a value set by fixed resistors, but I wanted to be able to easily adjust the target voltage.

    My Chargers

    To rectify these shortcomings, I designed a charger board based on the CN3791 chip that has, among other improvements, an adjustable MPP voltage, reverse-polarity protection, an (optional) battery protection chip, and a separate load path so the charger can accurately measure the charging current and battery voltage.

    I have more information about the chargers here. Current pricing (no pun intended) for small quantities of the Mod 3’s are $20/each and are hand-made in the US by meafrom US-made PCBs and globally-sourced components. Larger orders and orders for different Mods (e.g. with different battery protection chips, or none at all) are available with a little more lead time. Contact me if you’re interested in buying some.

  • Looking at a TP4056 Li-Ion charger with a FLIR ONE thermal camera

    I recently acquired a FLIR ONE thermal camera, which deserves a separate post reviewing it, but for now let’s look at the TP4056 Li-Ion charger with integrated protection circuitry.

    This is a pretty bog-standard, dirt-cheap Li-Ion charger that works really well. It does what it says on the tin: CC/CV charging, with charging current adjustable by replacing a specific resistor, 5V MicroUSB input, and pads/holes to accept connections to the cell, the load, and the charging power source (if one doesn’t want to use the USB port). No complaints at all, and no surprises.I like that it has a battery protection circuit as well: the protection chip monitors the charging or discharging current and voltage, and protects the cell against overvoltage (e.g. from over-charging), undervoltage (e.g. from over-discharging), and over-current situations by switching off the MOSFET that connects the battery to the load and charging chip.The FET is arranged in a cool way such that, even if the over-discharge protection has tripped and the FET is open, you can trickle charge through the FET’s body diode at a very low rate in order to slowly charge the cell up without stressing it. Once it reaches the release voltage, the cell will charge at the normal speed.One of the main reasons I bought the FLIR ONE thermal camera is to observe various electronic devices I have and see how hot they get, where the heat is dissipated, etc. Since the TP4056 is a linear charger and produces a modest amount of heat while charging, I figured this would make a great first test. Here’s one of the images I snapped:
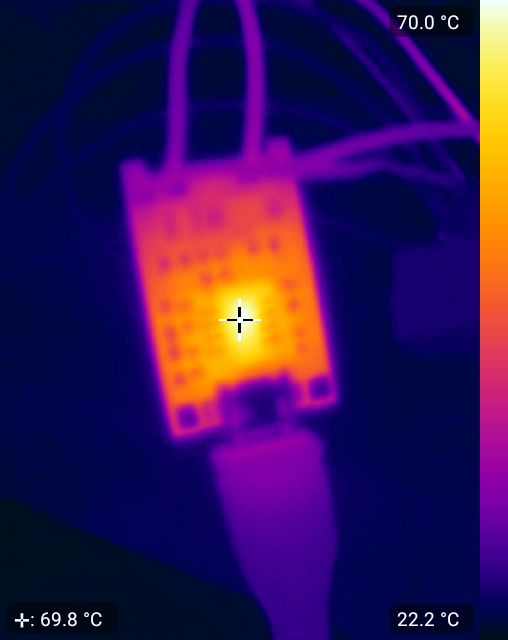
    As you can see, the chip gets moderately toasty when charging at 1A, and I can’t hold my finger on it for a more than a second or two. This is a top view with the chip and other components visible to the camera. The TP4056 also has a thermal “radiator” (using the language in the datasheet) pad on the bottom that should be connected to a copper plane on the PCB. The board has a bunch of thermal vias under the chip to conduct the heat away to the other side and the backside of the board is about the same temperature as the front. Neat.

    I foresee a lot of fun (and useful projects) with both the camera and the battery charger.